Feb 26, 2013

The Ultimate 2-in-1

    It really doesn’t get much better than chocolate cake. Who doesn’t love moist, fantastic, choctastic chocolate cake, right? But when you put cookie dough in said chocolate cake, the bar was just raised through the roof. Oh yeah, that’s right. Cookie dough. And don’t even try to pull that “you can’t eat raw egg” stuff, because it’s eggless.
    Here are some key tips to keep in mind when using “raw” cookie dough in desserts:
-Less flour is usually better, but it depends on the consistency you wish to reach.
-Mini chocolate chips are better for cookie dough fillings/frosting and regular-sized chips for layers or toppings of cookie dough.
-Cookie dough rocks so don’t be shy with the portions.
    I picked chocolate cake for this because the cake brings out the mini chocolate chips more than a vanilla cake would. The cupcakes were baked, let sit for a day (it makes them ten times better), then cored and stuffed with the cookie dough. They were frosted with a cookie dough buttercream and topped with more mini chocolate chips, just ‘cause.
  When you make the cupcake batter, it will seem too soupy- don’t question it. See if you can get your hands on some crazy awesome cupcake cups like I did, then fill the cups 2/3 full and bake them at 350, like the recipe says. If you really want to impress people, though, drop the oven temp to 325 after ten minutes. This will keep your cupcakes from getting too dry on top, while staying fluffy and delicious. For a stronger flavor, mix one tablespoon of instant coffee into the boiling water before adding it to the batter.
Cupcake
 Ingredients:
2 cups white sugar
1 ¾ cups all purpose flour
¾ cup unsweetened cocoa powder
1 ½ teaspoons baking powder
1 ½ teaspoons baking soda
1 teaspoon salt
2 eggs
1 cup whole milk
½ cup vegetable oil
2 teaspoons vanilla extract
1 cup boiling water
1/3 cup coarsely chopped milk chocolate
¼ cup mayonnaise
Directions:
1.       Preheat oven to 350F. Line 2 cupcake pans with baking cups.
2.       In a large bowl, sift together sugar, flour, cocoa, baking powder, baking soda, and salt. Make a well in the center (a crater) and add the eggs, vanilla, oil, and milk. Beat for 2 minutes at medium speed, stopping occasionally to scrape the sides of the bowl. Stir in boiling water (with instant coffee, if you wish) gradually, about 1/5 at a time, with a whisk.
3.       Once consistent, fold in chocolate and mayonnaise with a rubber spatula. Fill the cups about 2/3 full, and bake in preheated oven for 13 minutes, check doneness with a toothpick,  and put them back in for 2 minutes if the toothpick doesn’t come out clean.  Let them cool.
Cookie Dough Filling/Frosting
Ingredients
¾ cup melted butter
1 cup packed brown sugar
½ cup white sugar
1 tablespoon vanilla extract
1 teaspoon salt
1 ¼ cups all purpose flour
3 tablespoons milk
1 cup mini chocolate chips
***(Additional ingredients)
1 stick butter, softened
8 oz cream cheese, softened
1 ½ cups sifted confectioners’ sugar
1 teaspoon vanilla extract
2 tablespoons milk
Directions:
1.       Beat butter and sugars until a light caramel color, 1-2 minutes. Beat in vanilla, salt, and flour until consistent, then add milk. Stir in the chocolate chips by hand.
2.       Divide the dough in half; put one half to the side (this is for the buttercream).  Using a small knife cut out a cone-shape from the cupcakes, about 2/3 inch deep (you can save the scraps for AMAZING cake balls at the end). Fill the hole with cookie dough and put in the refrigerator.  Do this for each cupcake. If you run out of dough, you can take some from the dough you set aside, but make sure you’re not taking too much. If there’s leftover dough from the first step, just add it to the other half for buttercream.
3.       In a large bowl, cream the butter and cream cheese until fluffy, then beat in the confectioners’ sugar, then milk and vanilla. Add in the leftover dough and beat until consistent. Add extra chocolate chips if you wish (I wished). Frost the cupcakes to your heart’s desire (or just eat the frosting and say you forgot to make it).




Feb 14, 2013

Lemon Torte


   As a nice little break from chocolate-based recipes galore, I decided to humor my mom and make something with the fresh, tart taste of lemon and a thick cream in the layers of a yellow cake torte. It makes an easy recipe to throw together for a picnic or a party because you can use store-bought lemon curd, yellow cake, and Cool Whip in place of the mascarpone filling if you’re really in a pinch. Looking back on it, I would probably make this more like a trifle, in a bowl or a deeper dish because it doesn’t hold its shape very well, but it’s fine either way. I don’t even know if you would call this a torte… I guess it’s a cake, but trifle would work too. Whatever floats your boat.

   The lemon curd recipe was taken directly from the lovely Ina Garten. It is a simple yet successful way to make lemon curd and is perfect for this recipe. The mascarpone filling is a great, light and fluffy contrast to the tart curd. It is the same type of filling used in most tiramisu recipes.

   The yellow cake is just an awesome recipe to have on hand. It is an easy, one bowl recipe and comes out moist every time, but can easily be adapted for different recipes with the addition of filling, nuts, extracts and all that fun.

Ingredients:

For the curd:

3 lemons

1 1/2 cups sugar

1/4 pound unsalted butter, room temperature

4 extra-large eggs

3/4 cup lemon juice (3 to 4 lemons)

1/8 teaspoon kosher salt

For the cake

2 ½ cups All-purpose flour

2 ½ teaspoons baking powder

½ teaspoon salt

2/3 cup butter, softened

1 ¾ cup sugar

2 eggs

1 ½ teaspoons vanilla extract

1 ¼ cups whole milk

¼ cup mascarpone cheese

Directions

1. Using a carrot peeler, remove the zest of three lemons, being careful to avoid the white pith. Put the zest in a food processor fitted with the steel blade. Add the sugar and pulse until the zest is very finely minced into the sugar.

2. Cream the butter and beat in the sugar and lemon mixture. Add the eggs, one at a time, and then add the lemon juice and salt. Mix until combined.

3. Pour the mixture into a 2 quart saucepan and cook over low heat until thickened (about 15 minutes), stirring constantly. The lemon curd will thicken at about 170 degrees F, or just below simmer. Remove from the heat and cool or refrigerate (it will thicken as it cools).

4. Preheat the oven to 350 F. In a medium bowl, sift together the flour, baking soda, and salt and set aside. In a new bowl, cream butter and sugar until light and fluffy. Beat the eggs in one at a time.

5. Alternately add the milk and flour until they’re both used up, beating well after each addition. Using a rubber spatula, gently fold in the mascarpone until there are no more white streaks. Set the bowl aside.

6. Grease and flour two 9-inch round pans and gently spoon the batter equally into the pans. Bake in the preheated oven for 20 minutes, then check the cakes for doneness with a toothpick inserted in the center. If the toothpick does not come out clean, then bake for three more minutes and check again.

7. While the cakes cool, make the mascarpone filling; combine the egg yolks and sugar in a double boiler over boiling water and cook for ten minutes, stirring occasionally. Remove the bowl from the heat and whip yolks until thick and lemon colored, about 5-8 minutes.

  1. Add mascarpone to whipped yolks. Beat until combined. In a separate bowl, whip cream to stiff peaks. Gently fold into yolk mixture and set aside.


Assembly:

1.      Once the cakes are cool, remove them from the pan by lightly tapping the sides until the cake can move freely when shaken lightly. Flip the cake out of the pan  into the (clean) palm of your hand, and quickly flip it back over onto a flat work surface.

2.      Using a serrated knife, trim off any dome the cake has so it is flat on top. Slice the cake lengthwise like you would a hamburger bun and remove the top half (I’ve found this easiest to do by sliding a thin placemat, cutting board, or piece of cardboard under it and lifting it off).

3.      Put a layer of the lemon curd on the cake and spread so the surface is covered, but barely. Then scoop a fourth of the mascarpone filling on top and spread it ALMOST to the edge with a rubber spatula. Do another spoonful of the curd over that and gently spread it around the cream.

4.      Top with the next cake layer, pressing lightly down so the cream squeezes to the edges. If the cake is slumped on a side or not even, use trimmings from the top of the cake to balance it out. Repeat this step until you have yourself a four-layer torte/cake/trifle. Top with lemon zest if you want it to look extra-spiffy.


Feb 8, 2013

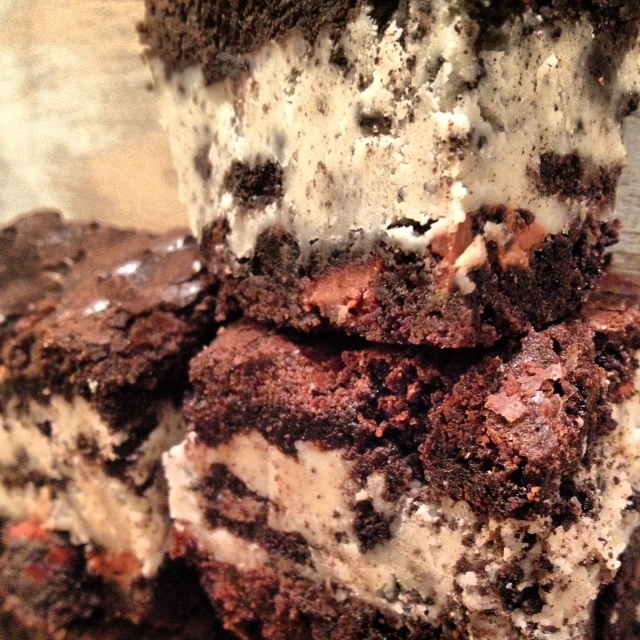
Cookies and Dreams Brownies


   Brownies are pretty cool… but brownies with fudge in the middle are cooler. Especially if that fudge is cookies and cream fudge and it’s very easy to make. No matter what, though, the coolest thing by far would have to be the fact that they are perfect for parties, dinners, pot-lucks, and afternoon, after-school, or midnight snacks. Also, breakfast, lunch and dinner.

   There’s not much to say about this recipe, it’s actually a pretty easy one despite the beautiful, jaw-dropping photographs of the end product. For the brownies, I would suggest using dark cocoa if possible. A fun little fact about the chocolate chips: if you toss them in flour before adding to the batter, they won’t sink to the bottom. I would definitely suggest having all your ingredients out before starting, and sift the dry ingredients before starting the butter/sugar mixture.

   As for the fudge, make sure the Oreo cookie crumbs aren’t too small; they should be more like chunks than crumbs. Make sure to use real white chocolate, and not candy coating. When you’re cooking the fluff, milk, sugar and butter, make sure to keep stirring for the whole time after it is at the full boil, or you will burn the bottom.

 Fudge on.


 Brownies:

Ingredients

1 cup butter, melted

3 cups granulated sugar

1 tablespoon vanilla extract

4 eggs

1 ½ cups all-purpose flour

1 cup unsweetened cocoa powder

1 teaspoon kosher salt

1 cup semisweet chocolate chips

Directions:

1. Preheat oven to 350 degrees F (175 degrees C). Line a 9x13 baking dish with aluminum foil and lightly grease.

2. Sift the flour, cocoa powder, and salt in a bowl and set aside.

3. Combine the melted butter, sugar, and vanilla in a large bowl. Beat in the eggs, one at a time, mixing well after each, until thoroughly blended.

4. Gradually stir flour mixture into the egg mixture until blended. Stir in the chocolate morsels. Spread the batter evenly into the prepared baking dish.

5. Bake in preheated oven until an inserted toothpick comes out clean, 35 to 40 minutes. Remove, and set pan aside to cool.

***Wait until the entire pan is cool to the touch before starting the fudge.

Cookies and Cream Fudge

Ingredients

1 (7 oz) jar marshmallow cream

1 ½ cups granulated sugar

2/3 cup evaporated milk

¼ cup butter

½ teaspoon kosher salt

3 cups white chocolate chips

1 teaspoon vanilla extract

1 ½ cups crushed Oreo cookies

Directions

1.      Please make sure you have everything ready, don’t wait until halfway through to crush the Oreos or measure out the chips, have it all at hand.

     2.      Take the brownies out of the pan and slice the COOLED brownies lengthwise, like you would a hamburger bun. It is okay if the top cracks a little. Put the top aside and place the bottom half back in the 9X13 pan, the sliced side facing up.

    3.      In a large saucepan over medium heat, combine marshmallow cream, sugar, evaporated milk, butter and salt. Bring to a full boil, and then cook for 6 minutes, stirring constantly.

   4.      Remove from heat and pour in white chocolate chips. Stir until chocolate is melted and mixture is smooth. Stir in vanilla, then the Oreo crumbs. Pour fudge over the bottom-half brownie in the pan and spread it evenly. Put the top over the fudge and lightly press it down. Cool in freezer for at least an hour or a refrigerator for two.

 
^^^^Brownies sliced in half.^^^